


Map/Protractor Skills Refresher
Time to dig out that protractor!

The compass always gets all the attention when training on this subject, so let’s show the lowly protractor some love and demonstrate why this piece of plastic is every bit as important as the compass by using it to answer two very important questions.
Question #1 is: How do I find my location on a map if I don’t know where I am?
Question #2 is: Now that I know where I am, how do I communicate that to someone else?
There’s a lot more to land navigation than this, but it’s is a great starting point on which to build, so let’s jump right in.
Go ahead and download/print the PDF map here: https://drive.proton.me/urls/9CM0HR69Y8#eKSeoxP01TsZ
If you don’t have a protractor, most will work, but one with more scaling options will work for more maps. I like the MapTools ones like this one:
You need a compass out in the real world, the Cammenga ones with tritium lamps are pretty nice, as are the Suunto MC2. Pick one that works for you and put some time in using it.
Question #1: How do I find my location on a map?
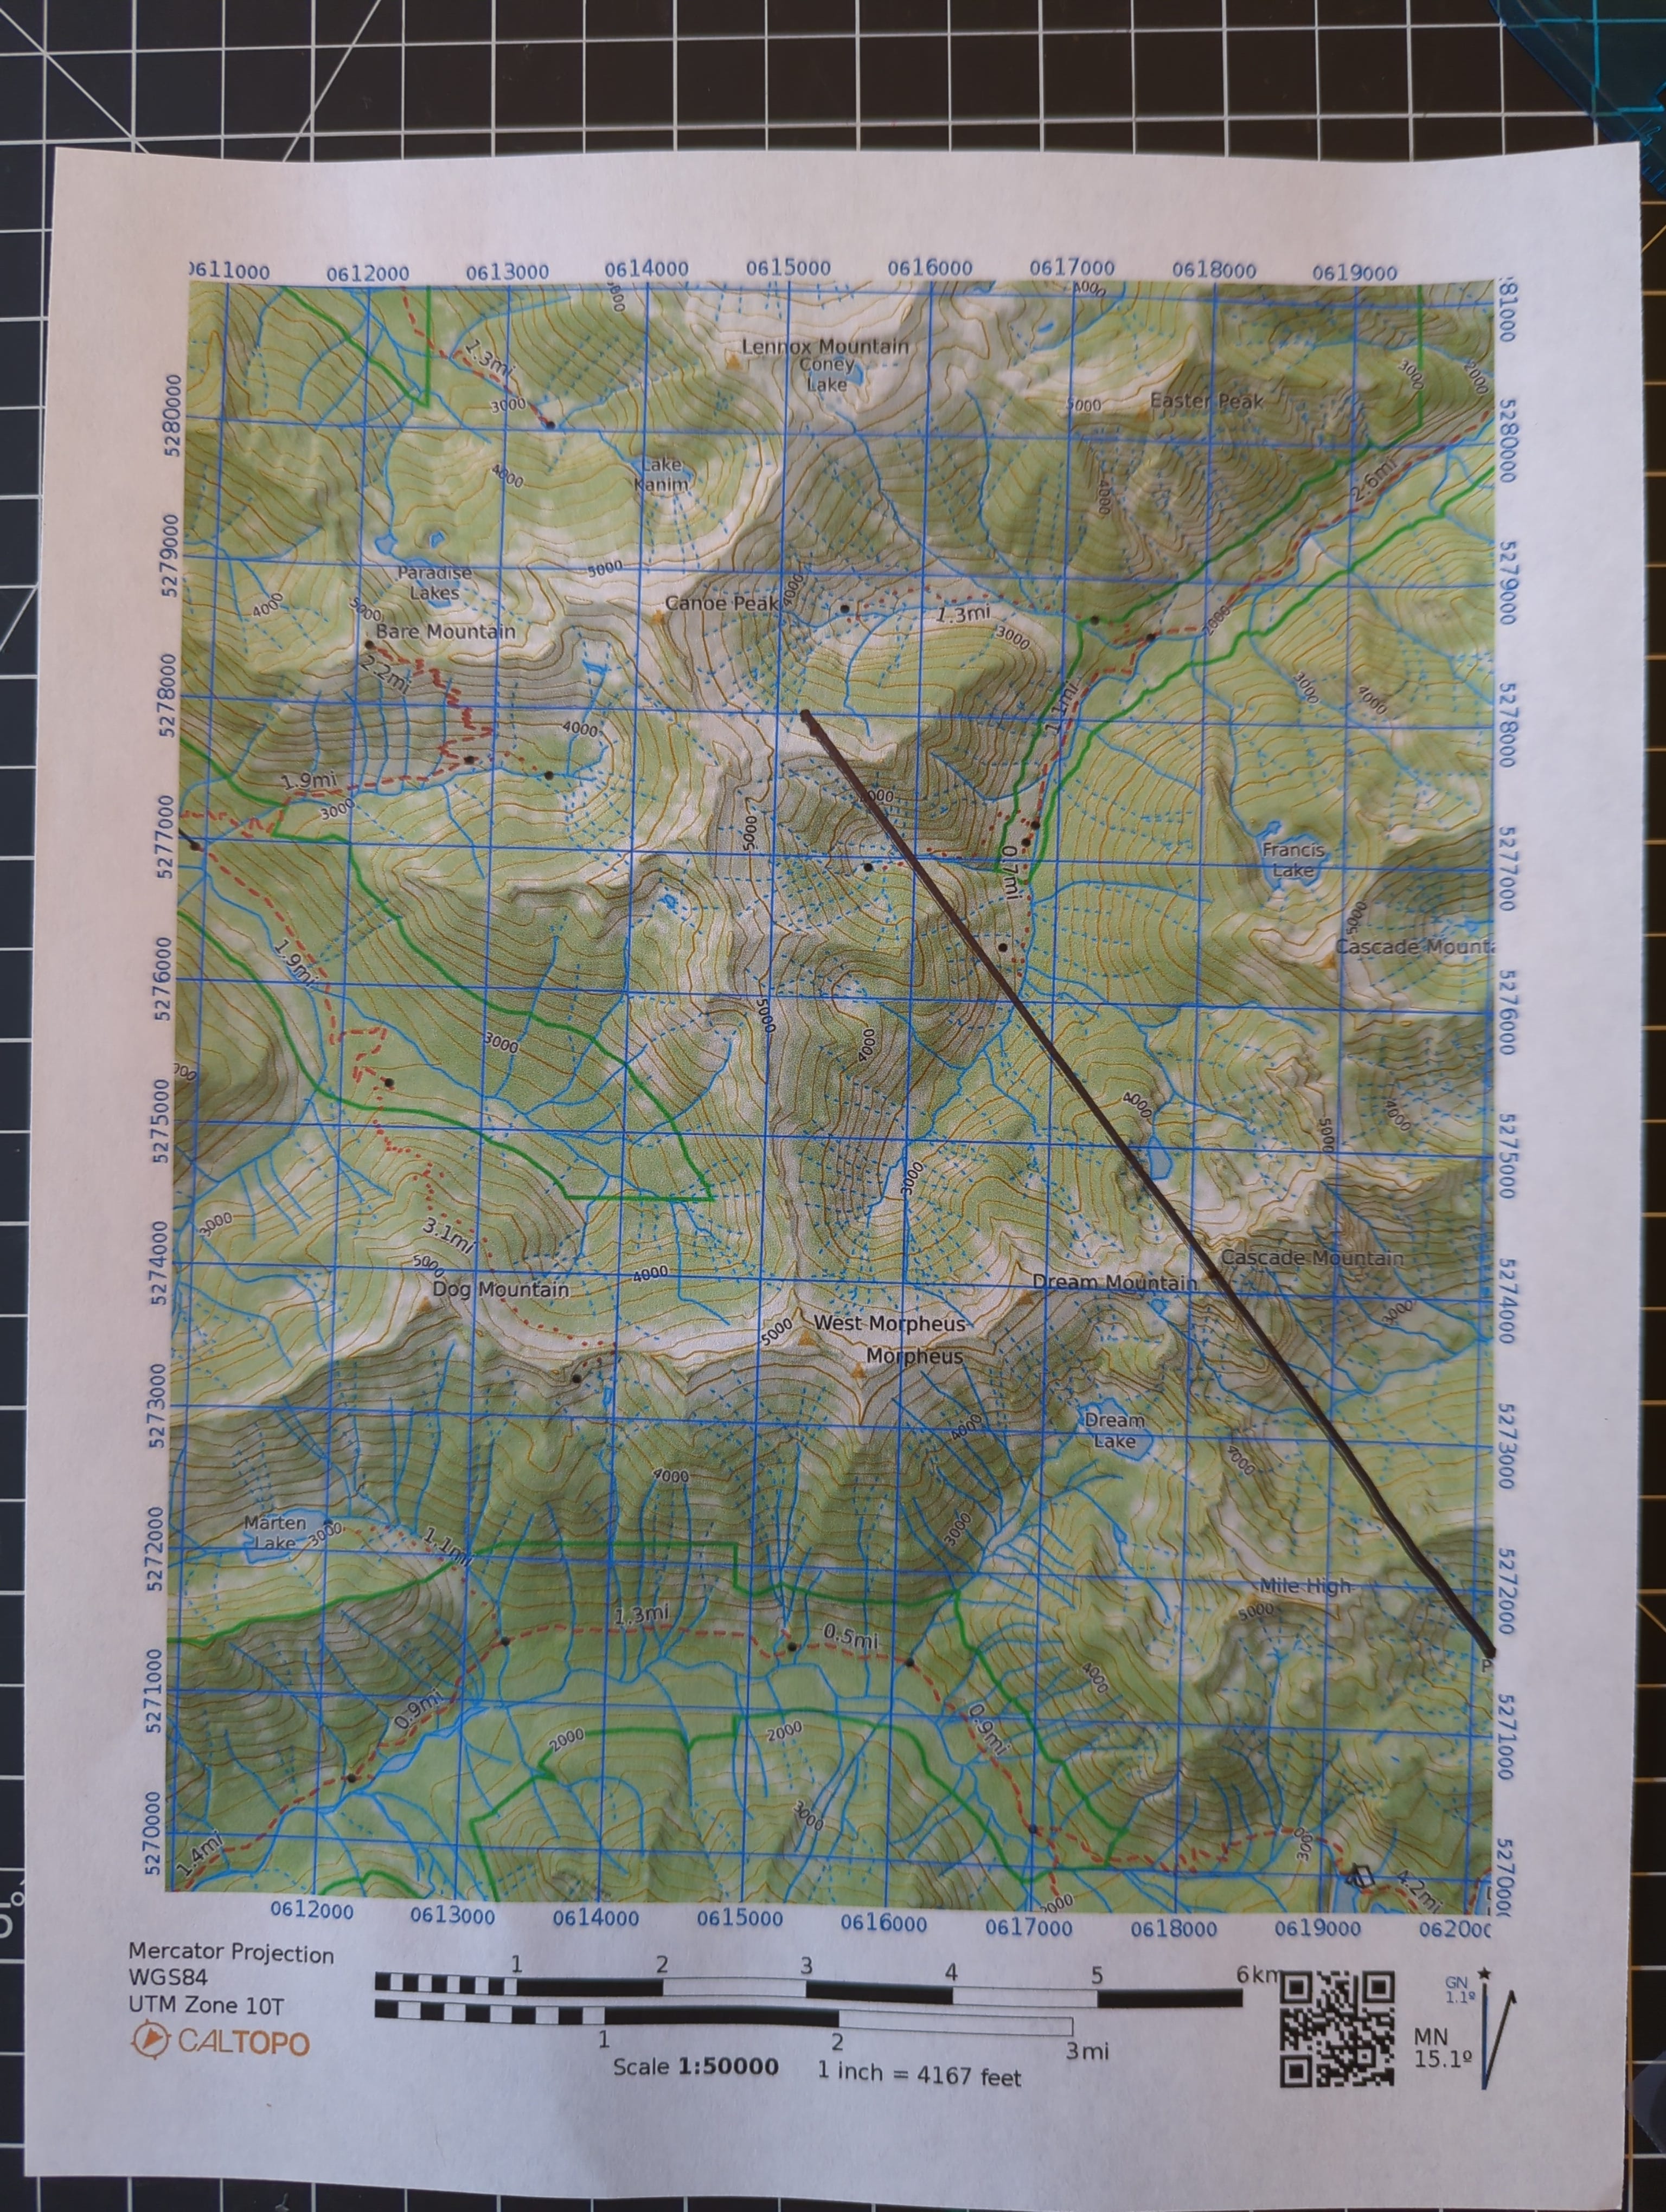
This one will always require some element of common sense. You were hiking on a trail that runs along a river when you took a side trail that became a game trail before vanishing, you tried to re-trace your path but soon encountered fallen logs you don’t recognize and it has become clear that you are lost. You can probably make a guess at where you are, but setting the right azimuth to get back on that trail is now crucial so you begin looking around to orient yourself to the map you brought along. Looking to the South, you see a ridgeline with a series of peaks, and on the East end of this ridge there appears to be a small lake almost in front of one of the higher peaks along the ridgeline.

There is some uncertainty there, but it’s at least a reasonable guess that the peak could be Cascade Mountain. This isn’t enough to go on however for such a crucial decision as getting home, so you continue to look around for more.
To the East you notice a small ridge, with topography around it that suggests there might be a lake behind that ridge, though you can’t actually see the lake. Immediately to the South of that ridge there is another peak.
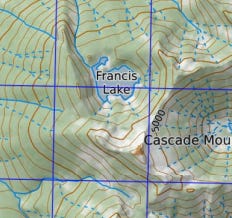
The map cuts off the name, but it’s Cascade Mtn North Peak. This increases your level of confidence, but 3 is always the magic number so you continue to look for more.
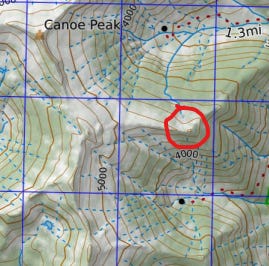
To the West you see a ridge, but without any identifiable prominent features. As you follow that ridge to the North however, you notice a definite rise toward a peak, or a false peak, you can’t quite tell. Looking at the map you decide that it must be Canoe Peak.

As you continue following the North ridge to the right, it descends from the peak, forms a noticeable saddle, then a small knob before curving to the North and falling away from view. Figuring that this must be the knob here on the map, you now have 4 points to use.
Now feeling confident that you have enough to work with, you begin shooting an azimuth with your compass to each of the 4 points you have identified and note them for plotting. I will not go into the compass technique in this article in order to avoid mission creep, but I do plan to make a future article on this subject, so stay tuned!
You take down the following MAGNETIC (more on this in a minute) readings:
Cascade Mtn: 126 degrees
Cascade Mtn North Peak: 81 degrees
Canoe Peak: 290 degrees
Unnamed Point: 324 degrees
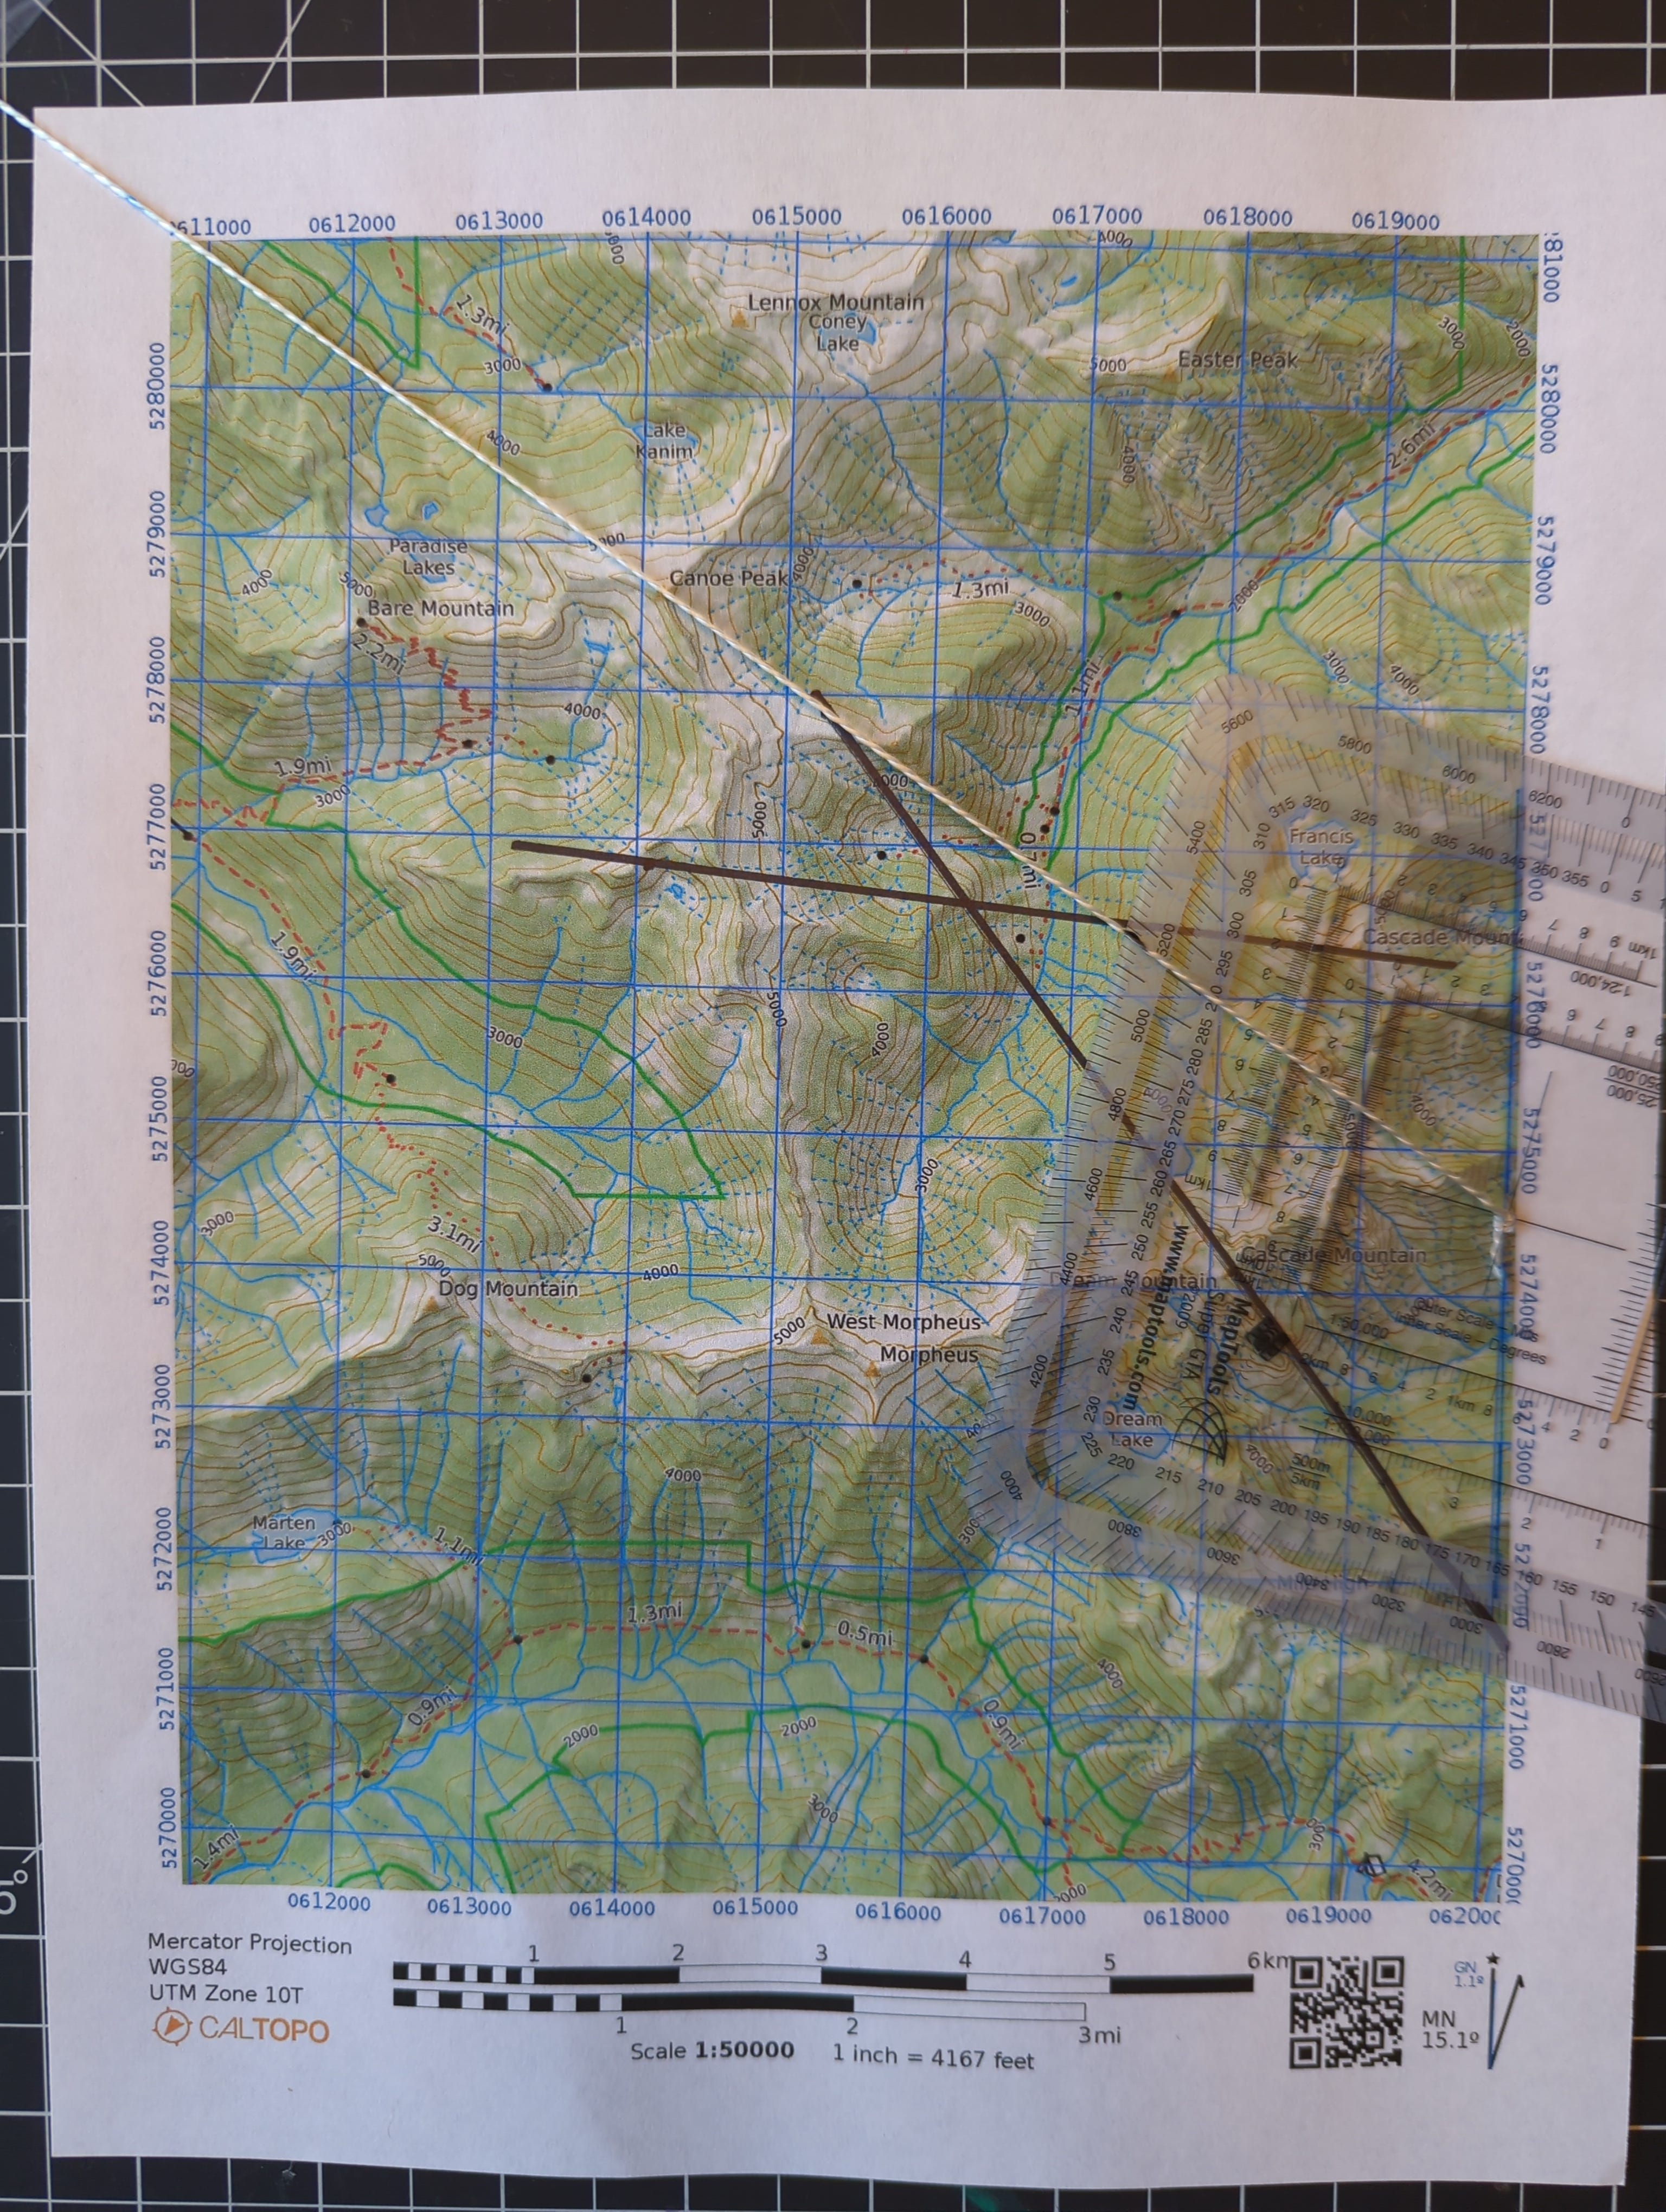
Now it’s time to plot them on your map. However in order to do so we will need to address the difference between Grid North and magnetic North. At the bottom of the map you will see the legend which shows the declination for the area of the map.

This means that your compass will show you a reading that is 15 degrees different from the map! Want the worse news? Magnetic North is moving every year, and also accelerating in how much it moves each year, so if your maps are 10 years old, the declination (difference between true and magnetic North) may no longer even be accurate. Fortunately you got on Caltopo before heading out so that you had current custom maps of the area you would be going to that you can print (and laminate) yourself for free.
What this means in practice is that when working between magnetic (compass) bearings and grid (map) bearings, which is exactly what we are doing here, we must convert. The hands down best way to do this is to pre-declinate your protractor. This makes conversion simpler and less error prone if you are cold, tired, hungry, and scared. The downside is that if you travel too far, your pre-declination could no longer be correct.
Here is an example of my pre-declinated protractor. When the blue line is lined up with the North South gridlines on the map, I am now using bearings shifted 15 degrees clockwise, just like the legend says magnetic readings will be.
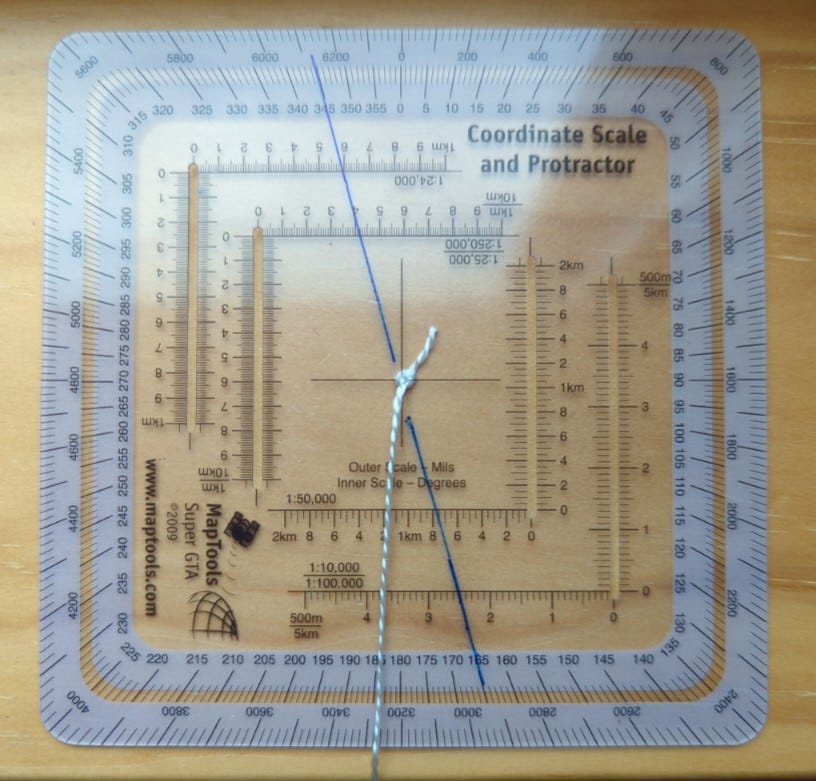
Also, note the string attached. Your protractor will likely not come with this, just a hole in the center where you can attach one. One the inner strands from paracord fits right through this hole, and an overhand knot keeps it from pulling through, almost like it was designed that way…
All right, with the subject of declination covered, let’s get our location plotted on this map! Starting with the 1st point, Cascade Mtn, we place our string over the point on the map while moving our protractor, ensuring that it is always well oriented on the blue declinated North/South, until the string shows 126 degrees.
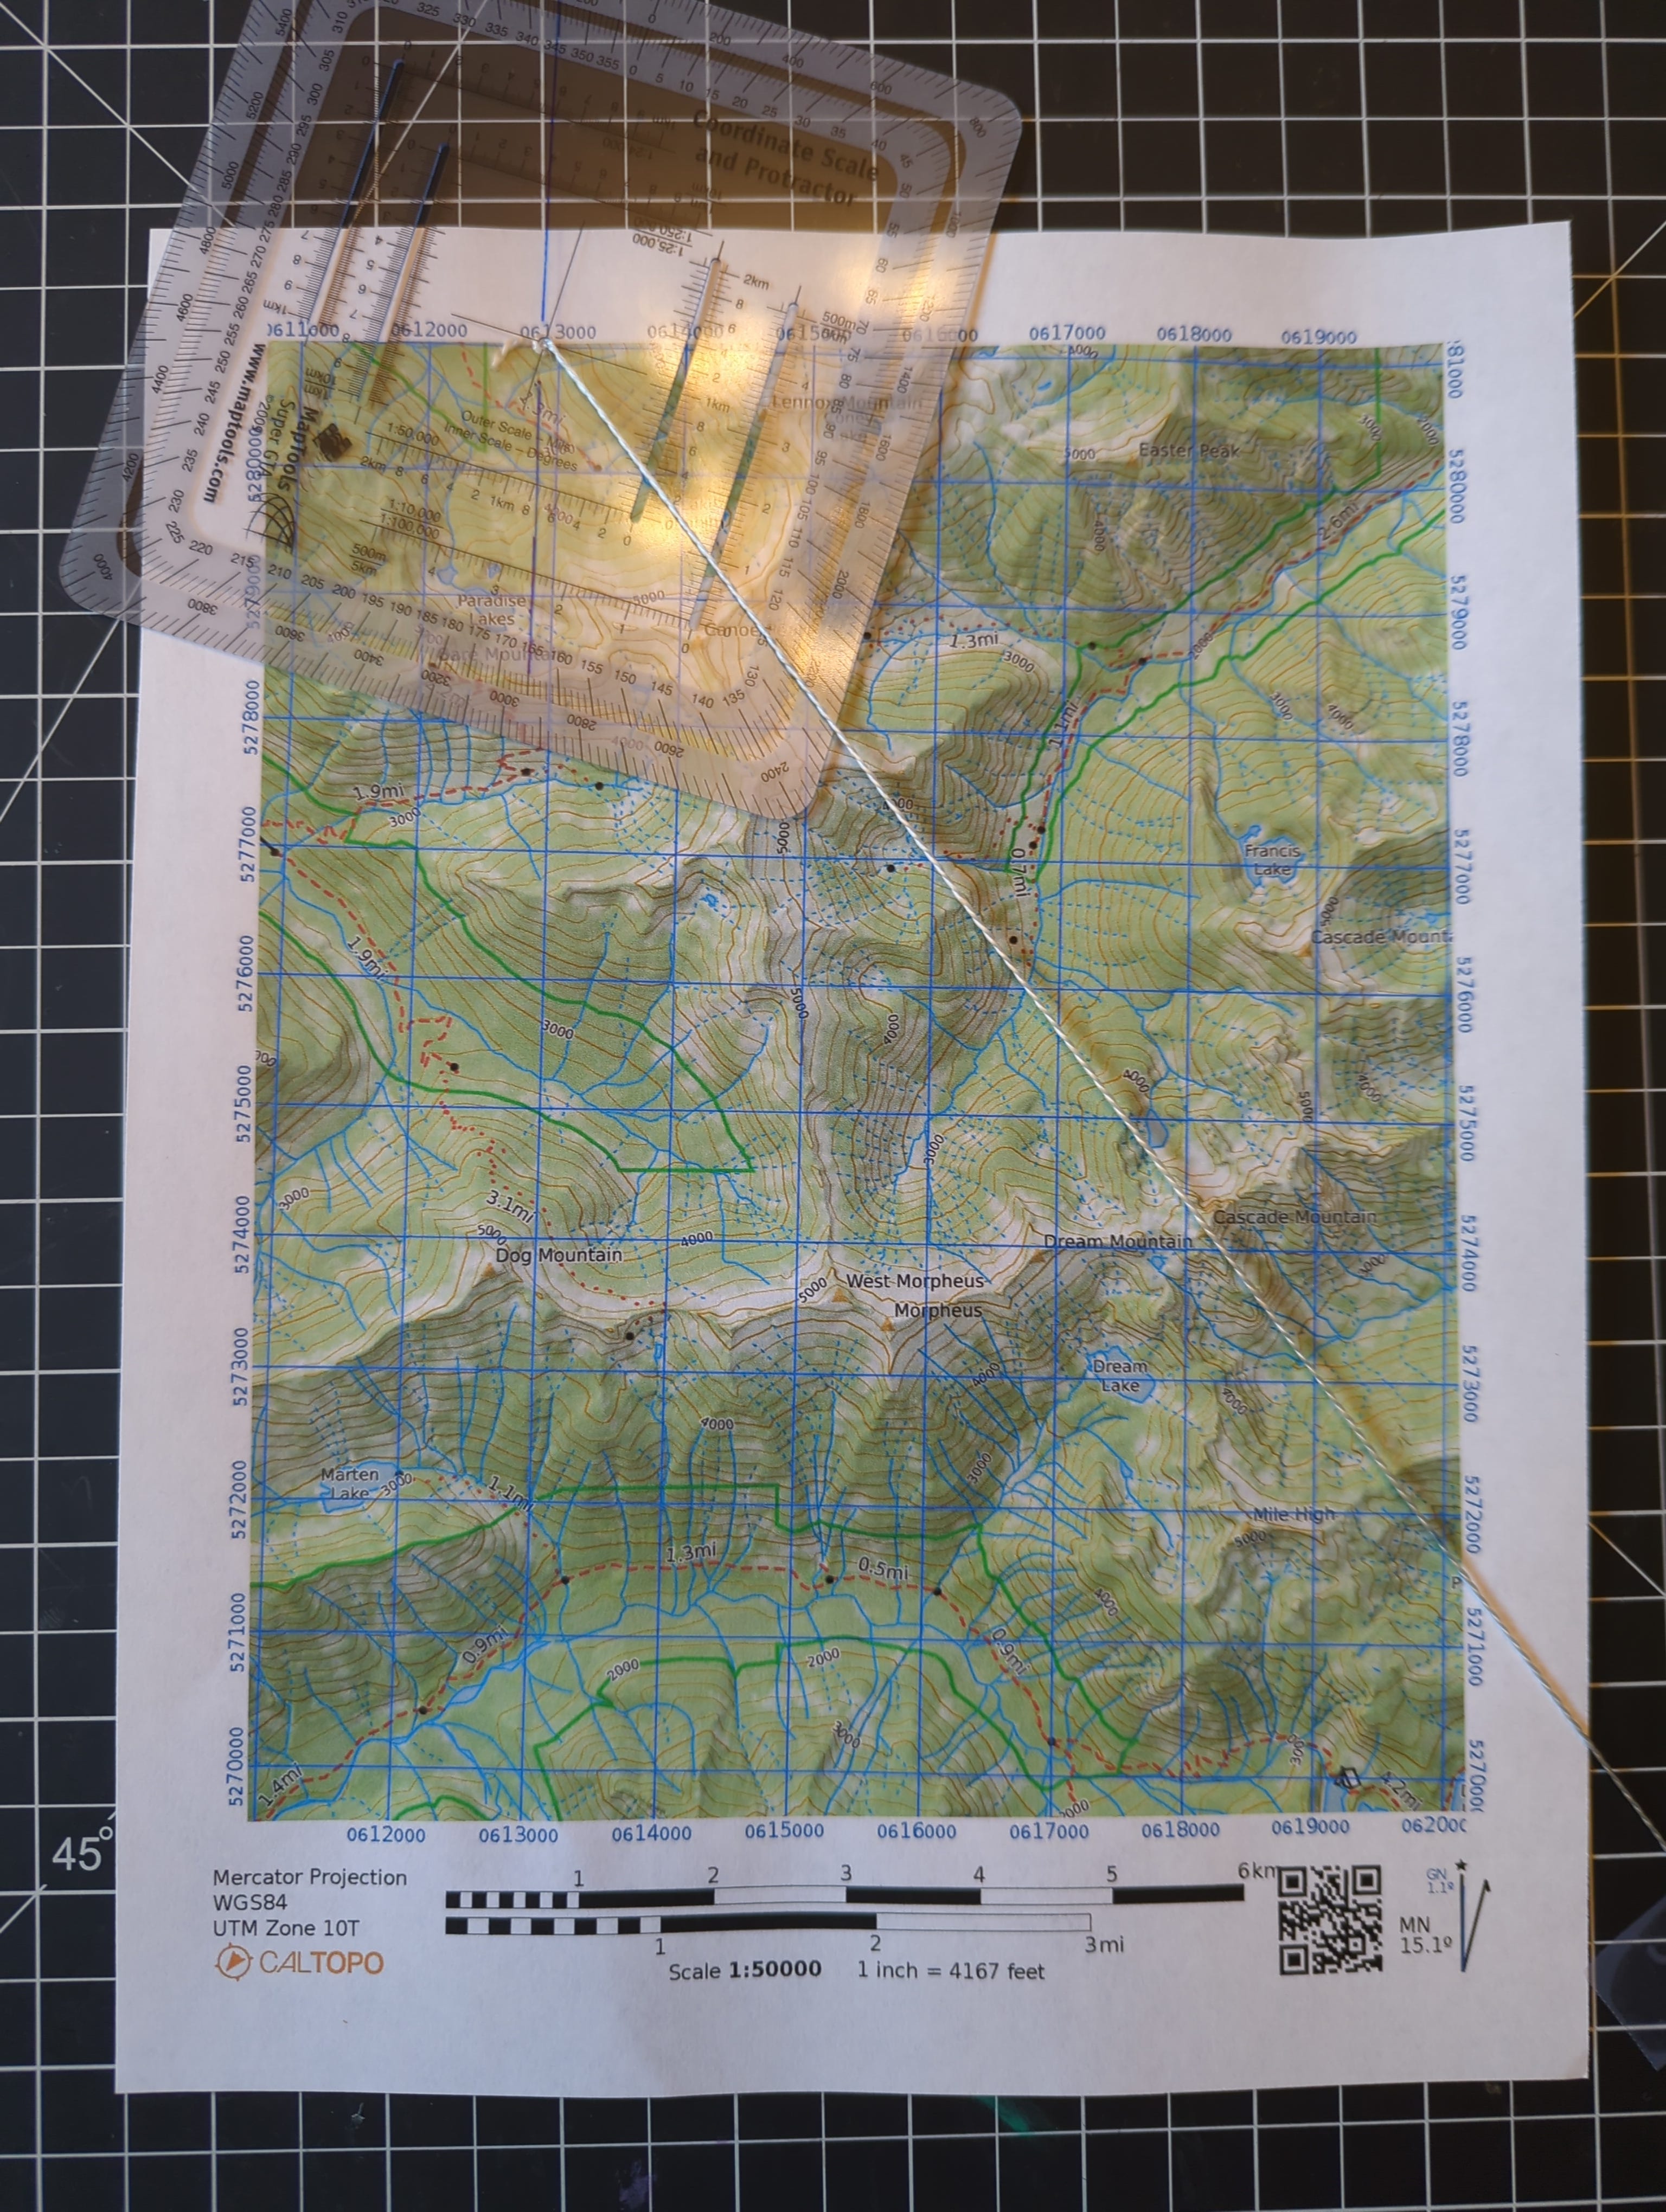
Mark at least 3 points along the string as best you are able, and then make a line through them. Don’t have a ruler? The edge of the protractor or a write in the rain notebook works pretty well.
In theory, you are somewhere along this black line, but to find out where, you need to plot more points, so we do the same with the second point of 81 degrees.
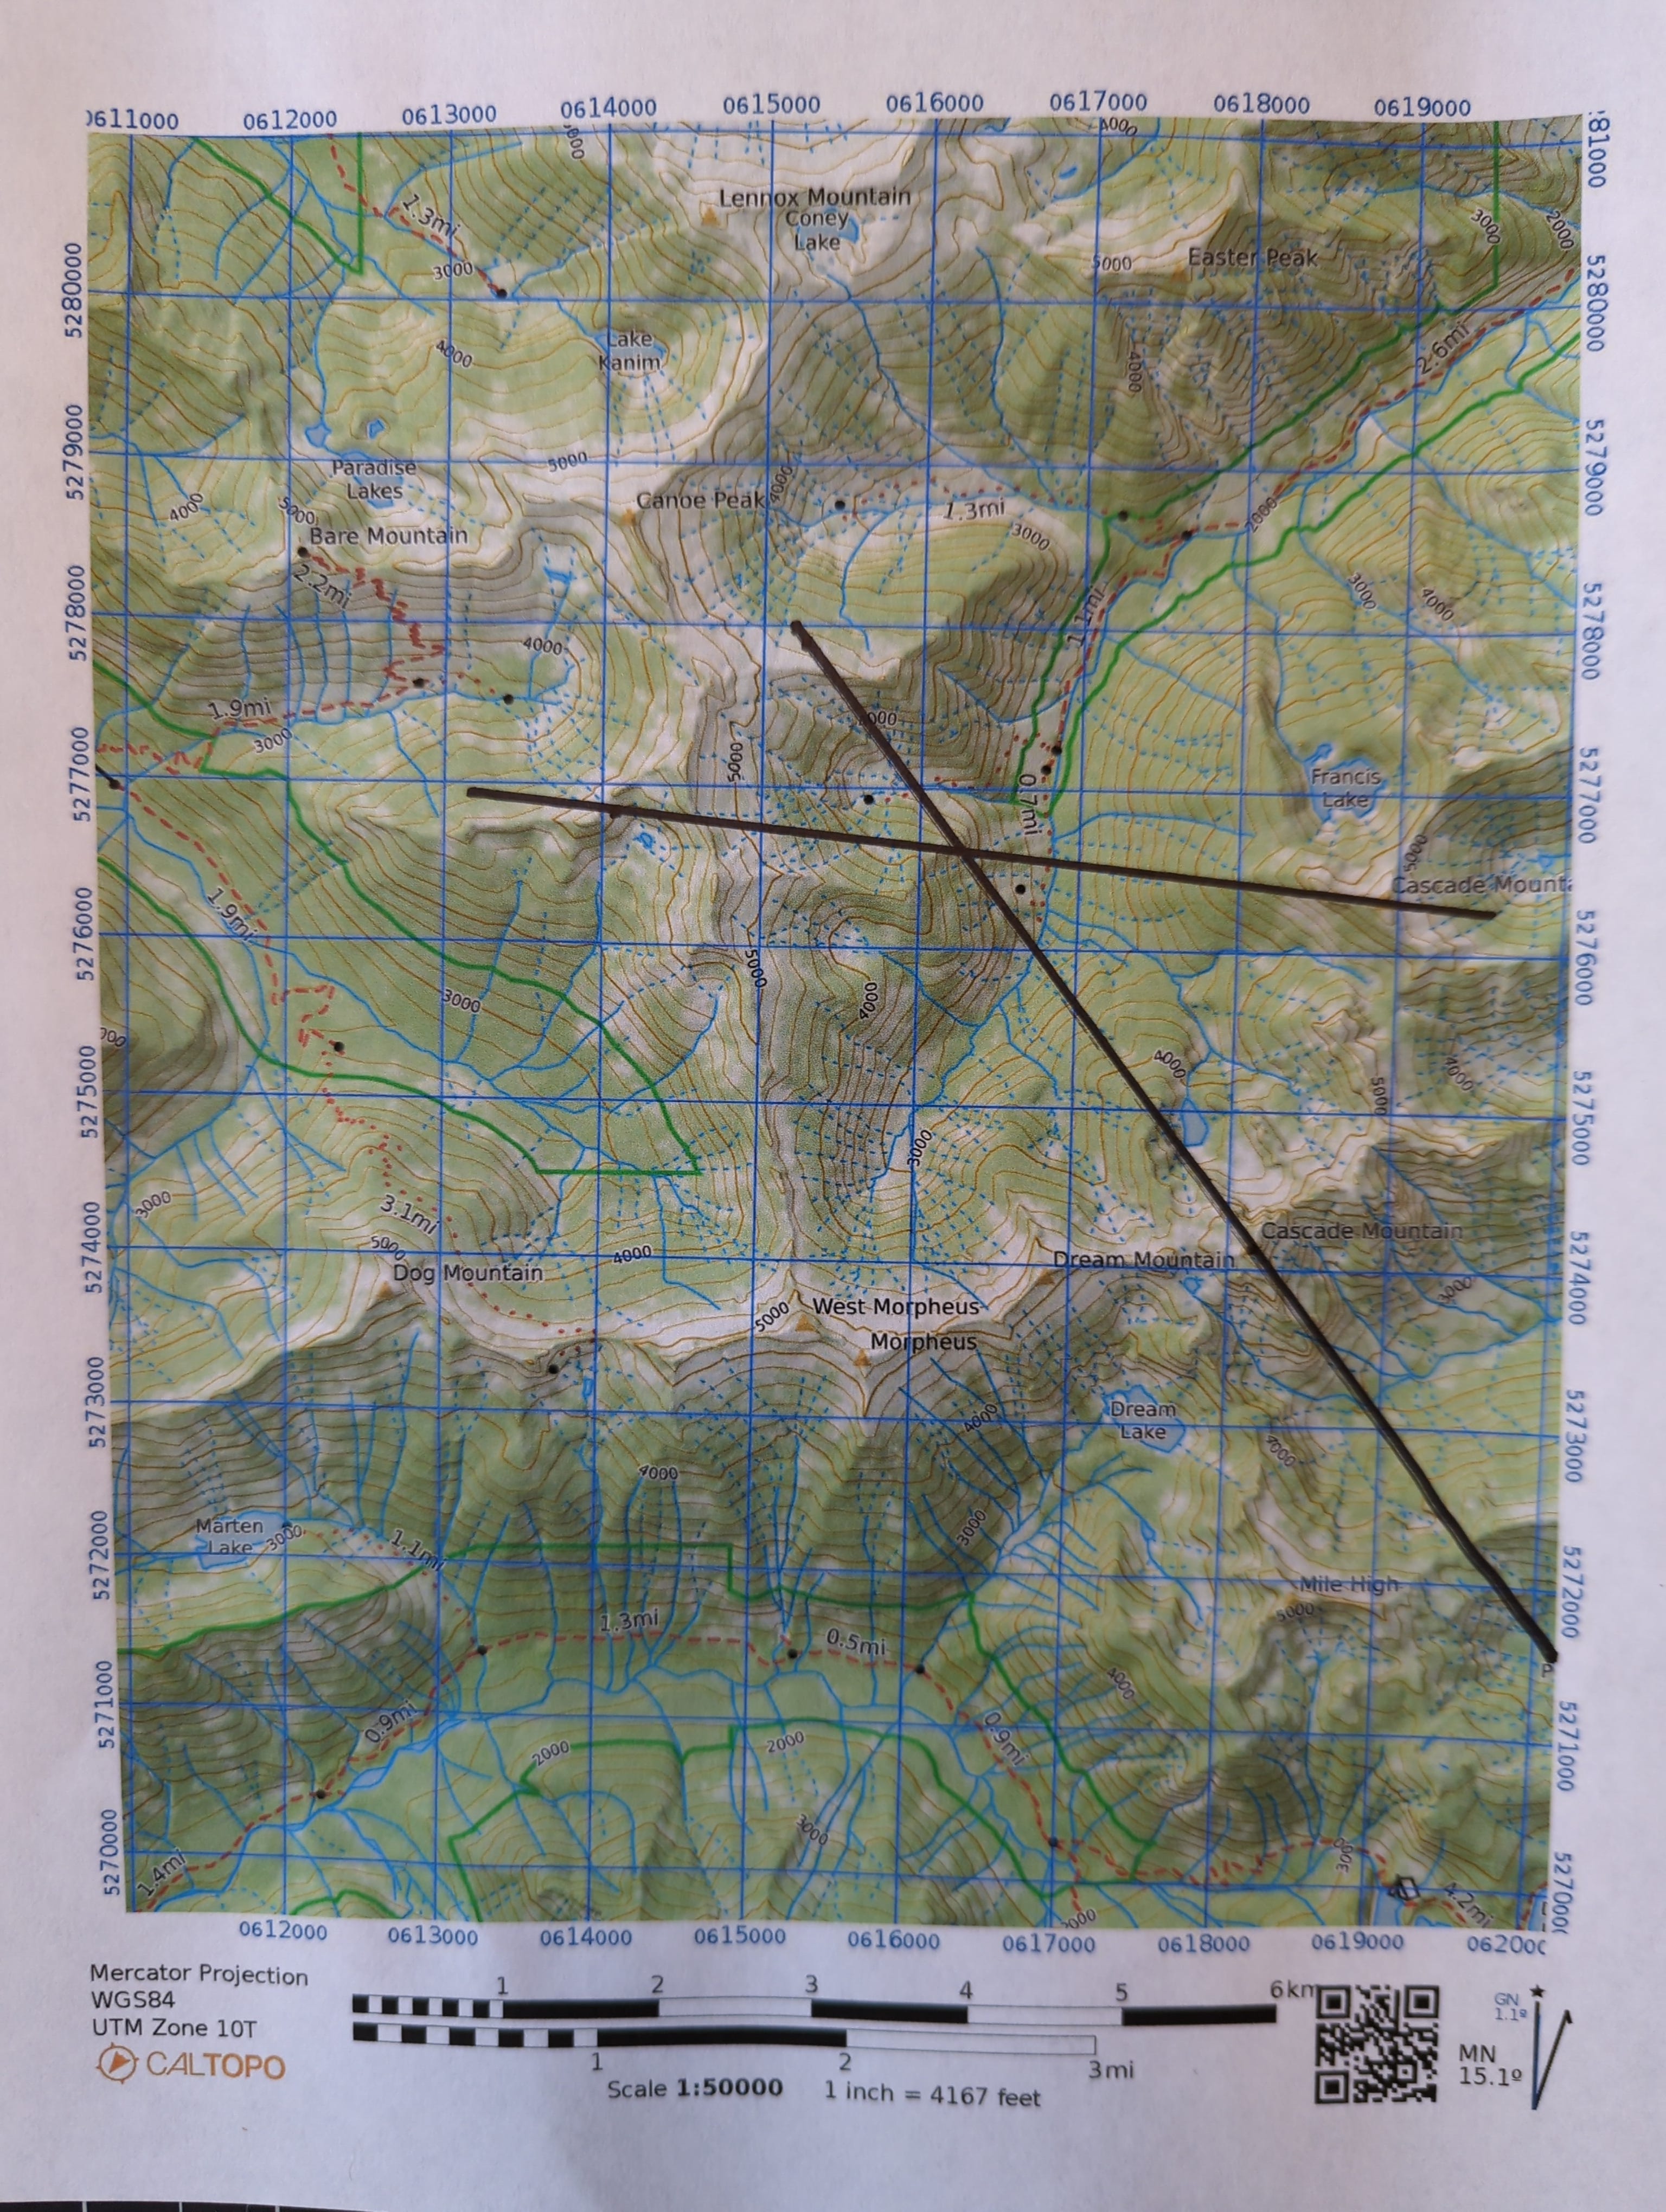
Where those 2 lines intersect is your location! But, like I said above, 3 is the magic number so you map your 3rd point of Canoe Peak at 290 degrees.
Here we can see very clearly that something is wrong. This line will not intersect your supposed location. This is an example of the limited information you will likely encounter when trying to do this for real, and a demonstration of why you need as many points as possible to plot. The more you have, the more reliable your location will be. Never make a decision off only 2 points if you can help it. We won’t mark this one on the map yet, as we question it’s accuracy, and instead we will plot the unnamed point at 324 degrees.
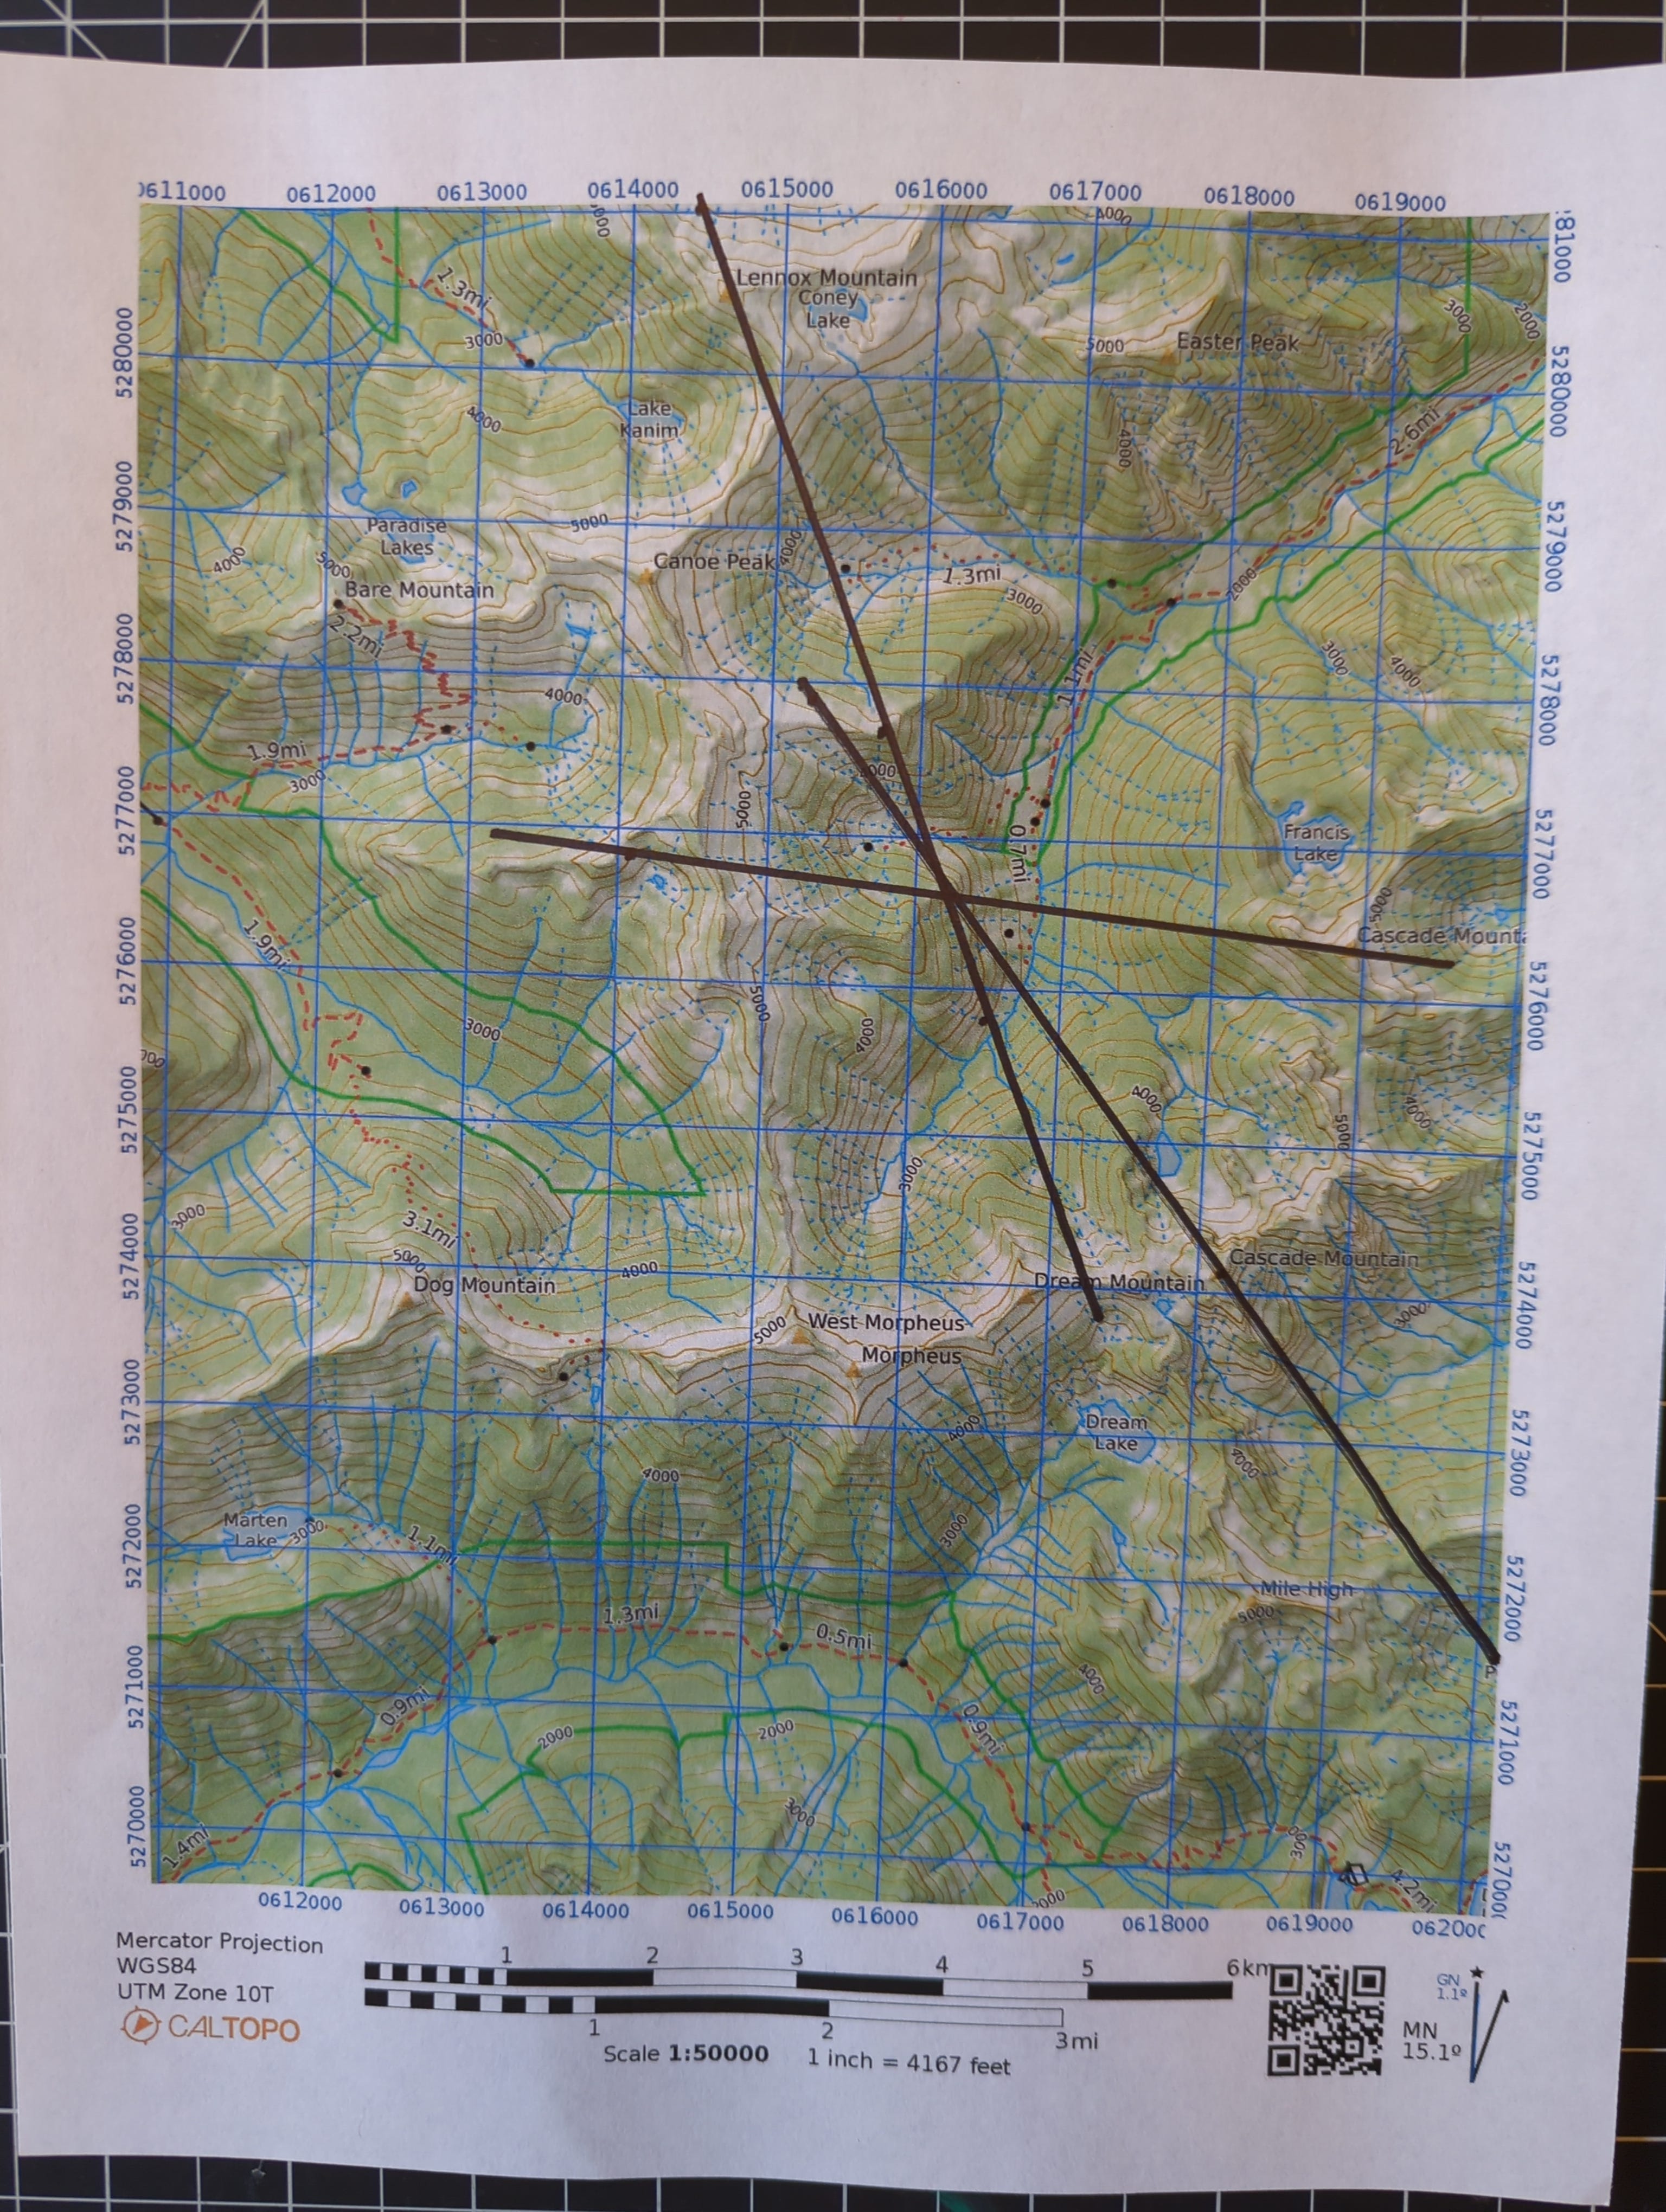
This one intersects the others pretty well. Notice that it’s not perfect, just like you are likely to see in the real world. It is however good enough to give us confidence in the accuracy of our location and in discarding the 3rd point as erroneous.
Now that we have our location, we can finally answer question #2: How do I communicate my location to someone else?
First, we will use the appropriate scale on our protractor (1:50,000) and line it up on the gridlines to the lower left of our point.

Next we shift the entire protractor along that horizontal grid line until our point is inside the vertical window.

Reading our location is now simple. The vertical grid line we started from is 0616000, and we shifted over by 200 meters, so our final measurement is 0616200 meters East. Our location is 600 meters above the horizontal grid line from which we started, 5276000, which gives us 5276600 meters North.
Let’s wrap this up shall we? the legend on the map gives us out UTM Zone: 10T. So our complete location is: 10T, 0616200 meters East, 5276600 meters North!
Now that you have the idea, take a victory lap and tell me:
What is at 0612625 E, 5237750 N?
How about 0614150 E, 5278650 N?
Now map 2 points of your choosing.